|
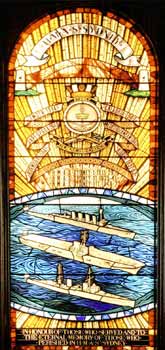
Australian Light Cruiser HMAS Sydney 11, her Life, Death, and Finding the Wreck
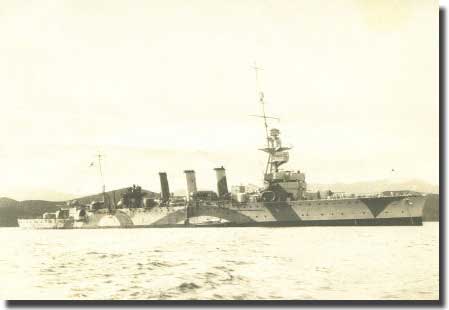
The RAN light cruiser HMAS Sydney 11, the second to carry the name of the largest capital city in Australia was laid down on July 8, 1933 for the Royal Navy as HMS Phaeton, at the shipyard of Swan, Hunter and Wigham Richardson, Wallsend and Tyne, England. This ship was bought by the Australian Government before the launching on September 22, 1934 by Mrs Bruce, wife of the then Australian High Commissioner in UK. Perhaps I should distinguish between a light and a heavy cruiser, the former carries 6 inch guns that use a 100 pound shell, whilst the heavy cruiser carries 8 inch guns that hurl a 256 pound shell, some 2.5 times the clout of the 6 inch shell. Two types of shell are available, Semi Armour Piercing ( SAP) designed for inter ship engagement, to pierce the hull of the enemy ship before exploding, or High Explosive ( HE ) for shore bombardment, or Anti Aircraft fire. During WW2, if our ship was loading ammunition and it was basically HE, we knew that our next operation would be a landing on enemy held territory in the Pacific, and we were to be part of the Bombardment Force, that pounded the landing area for several days before the Marines stormed ashore, usually against little opposition.
Sydney Commissions. Sydney arrived in Australia for the first time on August 2, 1936, with Captain John Waller Royal Navy taking over from Fitzgerald on October 9, 1937. With the outbreak of WW2, the ship was in Fremantle Western Ausralia, now at last, on November 16, 1939 an Australian, Captain John Collins RAN took command.
In April of 1940 Sydney was off to join the Mediterranean Fleet, arriving in Alexandria on May 26 to become part of the 7th. Cruiser Squadron. Her first action was to be part of the bombardment force at Bardia on June 21. On June 28 with her Cruiser Squadron they came across three Italian destroyers at dusk, two of the enemy ships gave the cruisers the slip, the Italian warships excelled at taking off to disappear at high speed. Sydney's role was basically to finish off the Italian destroyer Espero, and rescue 47 of her crew. Sydney was also part of a British force of 3 battleships, a carrier, 4 cruisers and accompanying destroyers, that ran into the Italian Fleet of 2 battleships, 10 cruisers, and 24 destroyers. The meeting was inconclusive as the Italian Fleet withdrew northwards. The Battle of Cape Spada.
Now by 0923 ( 9.23 AM ) the Italian was put out of action 5 miles from Cape Spada, and our destroyers finished her off and she sank at 0959 ( 9.59 AM ) By 1037 ( 10.37 AM ) with but 10 rounds of 6 inch shells available Sydney called off the chase and sailed for Alexandria to fuel and re ammunition ship.
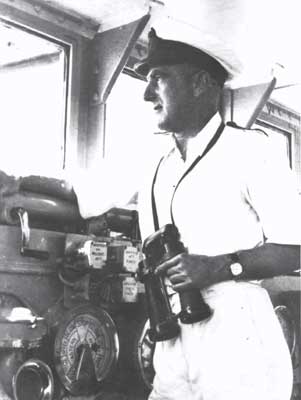
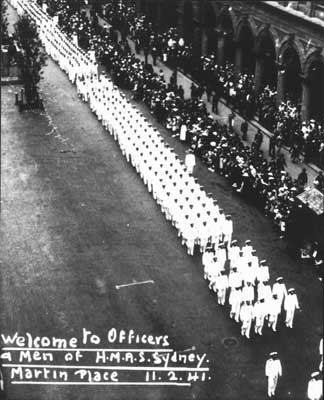
The ship covered convoys and then docked at Malta on December 23, for a brief refit which was completed by January 8 in 1941. She now sailed for home in January, to reach Fremantle on February 5. and finally arrive in her name sake city of Sydney on February 10, to be accorded a hero's welcome, and her crew paraded through the city to adoring crowds. Captain Joseph Burnett RAN relieved Collins on May 14, 1941 to take over his first command, he had been driving a desk at Navy Office in Melbourne. Burnett and Collins were two totally different types of Naval Captain, later in the war I served with Commodore John Collins when he was in command of Australian ships as part of a US Task Force, and we were present in Tokyo Bay for the signing of the Japanese Surrender on Sunday September 2, 1945.
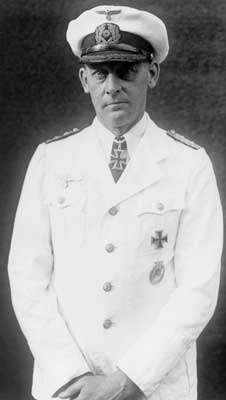
John Collins had been wounded by the first Kamikaze aircraft crashing into HMAS Australia at Leyte Gulf on October 21, 1944, he was both a confident and efficient Naval Officer who was later knighted, and made a Vice Admiral. He served his country on retirement from the Navy, as our High Commissioner to New Zealand. Sydney was now employed on the Australia Station carrying out both patrols and convoy duties. The Battle with the Raider Kormoran, and sinking of both Sydney and Kormoran. She did not arrive as expected and the District Naval Officer, Western Australia, reported accordingly to the Naval Board at 11 a.m. the following day that Sydney was overdue. This did not immediately concern the Naval Board as they had been advised that Zealandia had arrived later than anticipated and it was assumed that Sydney too had been delayed. There was also the possibility that she might have been diverted for another purpose and had not broken radio silence. When however, she had not returned by 23 November, she was instructed by the Naval Board to report by signal. There was no reply. The reconstruction of events leading up to Sydney's disappearance relies primarily on information gathered from interrogations of German survivors from the raider HSK Kormoran which Sydney engaged on the afternoon of 19 November 1941. The following is an account of Sydney's final action and subsequent loss based on surviving records. Returning from her convoy duties to Java, Sydney was proceeding south along the north west coast of Western Australia when she sighted what appeared to be a merchant vessel at about 1600 on 19 November 1941, some 130 miles west of Shark Bay. The ship was in fact the German raider Kormoran, (Commander Theodor Detmers) disguised as the Dutch merchantman Straat Malakka. Sydney challenged the vessel continuously using her searchlight whilst at the same time closing the range between the two ships. Merchant vessels were known to be less efficient at visual signalling and the
Sydney's efforts to establish the true identity of the vessel resulted in her closing the range to a point where she no longer had the advantage of her superior armament. At approximately 1715 Sydney had drawn almost abeam of Koromoran to starboard, less than a mile distant. Both ships were steering West-South-West at about 15 knots. The
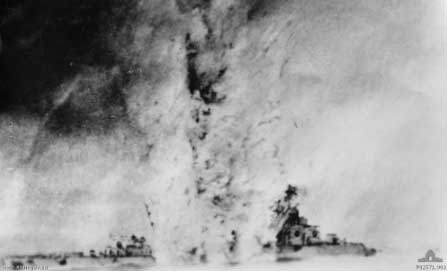
Finally, when concealment of his vessel's true identity was no longer possible, and with the advantage of surprise, Detmers ordered the Dutch colours to be struck, hoisted the German Naval Ensign and opened fire at approximately 1730 with all armament at a range 'somewhat more than a mile'. It is likely that the raider's first salvo destroyed Sydney's bridge, with the result that her primary control was immediately put out of action. Sydney's own guns opened fire almost simultaneously with a full salvo that passed over Kormoran without inflicting damage. Kormoran again scored hits on Sydney with two salvos again hitting her bridge For a few seconds after her initial salvo Sydney did not reply. It appears that her forward "A" and "B" turrets were put out of action leaving only her after turrets "X" and "Y" to respond. It was reported by the Germans that Sydney's "X" turret opened fast and accurate fire, hitting Kormoran in the funnel and engine room. " Y" turret is said to have fired only two or three salvos, all of which went over. At about this time one of the raider's two torpedoes struck Sydney under "A" and "B" turrets. The other passed close ahead of the stricken ship, which was subjected to enfilading fire. With her stem low in the water, Sydney now turned sharply towards Kormoran as though attempting to ram. As she did so, the top of "B" turret was blown off and flew overboard, the cruiser then passed under her stern, heading to the southward and losing way. Kormoran, maintaining her course and speed, was now on fire in the engine room where hits by Sydney's "X" turret had caused severe damage. Smoke from the fire hid Sydney from Kormoran's bridge but the raider continued to engage with her after guns as the range opened to approximately 4,400 yards. At about 1745. Sydney fired four torpedoes. Detmers was then turning to port to bring his broadside to bear, however as he did so Kormoran's engines began to fail. The torpedo tracks were sighted, but Kormoran cleared them and they passed astern. Simultaneously the raider's engines broke down completely. Sydney, crippled and on fire from the bridge to the after funnel, steamed slowly to the south returning only sporadic fire from her secondary armament. Although by now the range had opened to 6,600 yards Sydney continued to receive steady hits from Kormoran's port broadside. At 1800, at a range of 7,700 yards, Kormoran then fired one torpedo that missed Sydney's stern. Although this fierce action had lasted only half an hour both ships had been dealt mortal blows. Kormoran fired her last shot at 1825 at a range of about 11,000 yards. In all, she fired approximately 450 rounds from her main armament and hundreds from her anti-aircraft batteries. With the gathering gloom the form of Sydney disappeared from view and was last seen by the Germans about ten miles off, heading approximately South-South-East. Thereafter, until about 2200, all that was seen was a distant glare then occasional flickerings until midnight at, which time all trace of, Sydney disappeared. Of Sydney's total complement of 42 officers and 603 ratings, none survived. The only material evidence recovered from Sydney was an Australian naval type Carley life-float recovered eight days after the action by HMAS Heros and an Australian naval pattern life-belt recovered by HMAS Wyrallah.
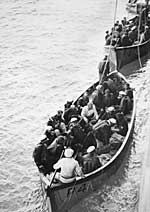
Kormoran Survivors. At this period some 380 officers and men remained alive. Almost all the officers and enough ratings to man the guns, waited on board while the final scuttling arrangements were made. Remaining life saving equipment consisted of two steel boats located forward in No. 2 hold, however damage to the ship delayed the launching of these. At midnight, with smoke increasing heavily on the mining deck, the scuttling charge was fired, and the last boat cast off. Half an hour later at 0035 the mines carried by Kormoran exploded and she sank rapidly stern first. During the final abandonment a large rubber boat sank without warning, throwing some 60 men into the sea who drowned. At 1700 (Western Australian time) on 24 November 1941 the British tanker Trocas bound Palembang for Fremantle reported by W/T (wireless telegraphy) the rescue of 25 German seamen from a raft sighted some 115 miles West-North-West of Carnarvon. This was the first positive evidence of a possible naval engagement involving the overdue Sydney. Naval authorities immediately despatched four RAN auxiliary craft with armed guards on board to rendezvous with Trocas. At the time of receipt of the signal from Trocas air searches seeking Sydney were already in progress. Unbeknown to the naval authorities the transport Aquitania, had also sighted a raft and rescued 26 Germans the previous day (23 November). Maintaining W/T silence her command passed on no information of this until 27 November, when she informed the signal station at Wilsons Promontory of her discovery. The air searches produced their first results early on the morning of 25 November. At 0700 a life-boat was sighted North-North-West of Carnarvon. Further sightings during the day revealed up to five boats in the area at that time. Eventually two boats, those commanded by Lieutenant Commander Henry Meyer and Chief Petty Officer Paul Kohn came ashore unaided some 50 and 70 miles north of Carnarvon respectively. Organised land parties were despatched and apprehended these groups during the afternoon of their landing. The Steamer Koolinda picked up a third boat, Centaur one (containing Detmers) and HMAS Yandra one. Based on records made at the time the total number of Kormoran survivors rescued was as follows:
Statistics.
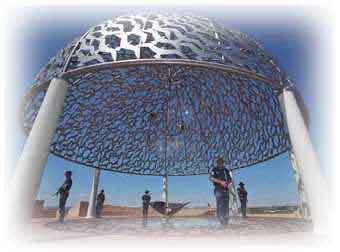
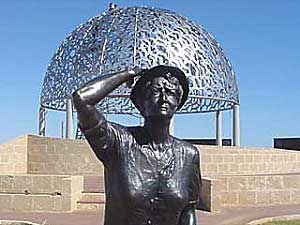
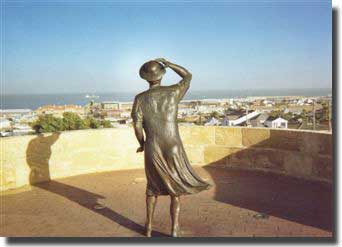
Memorials to HMAS Sydney in Geraldton W.A and Sydney Harbour NSW.
See also "Memorial to HMAS Sydney and her crew is dedicated at Geraldton in Western Australia" Loss of Sydney.
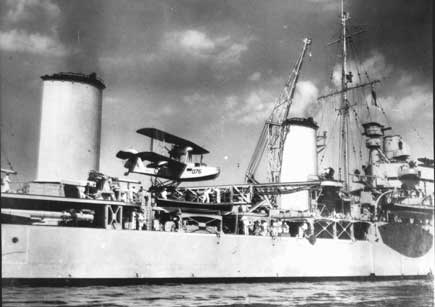
Captain Burnett's Tactics. If Captain Collins had still been in command, I believe he would have tackled this problem in a totally different way and survived. International Naval Reunion, Melbourne, Australia. Whilst assisting the Organising Committee, I was given the task of arranging the seating for the formal Luncheon held in the main ballroom of the Southern Cross Hotel. In organising each table I tried to equate the number of guests from overseas with Australians, but, for one particular table, I arranged a total group of very interesting overseas guests, and just myself as the only Australian present. One of my group was Engineering Professor H. Ahl, from Berlin. As a Sub Lieutenant, I knew he had been the Pilot Officer of the Arado aircraft carried by "Kormoran" at the time of her action with "Sydney." He survived the fight with her, and became a Prisoner of War in Australia. I wanted to talk to him about the action, and what he thought had happened to "Sydney."
I was only able to extract from him the Party line as to what happened on that fateful day so long ago, on the 19th. of November, 1941. He told me that he last sighted "Sydney," still heavily on fire, on the distant horizon, some time before midnight, and she just disappeared. What a disappointing end result. Blockade Runner Ramses. Two weeks survivor's leave mostly taken up by rekitting my uniforms followed, ( I had leapt off the Canberra's burning upper deck onto the US destroyer Blue, clad only in a pair of overalls, socks and my boots, all my belongings going down with my ship) then I was appointed as a Watch Keeping Sub Lieutenant to the old light cruiser HMAS Adelaide, working in the Indian Ocean on escort work out of Fremantle in Western Australia.
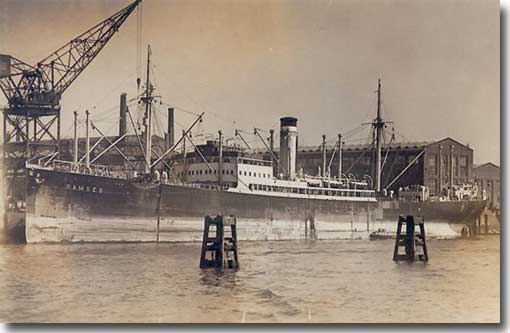
HMAS Adelaide involved in the action against the German Blockade Runner Ramses I had not long settled into my new ship, where Kevin O'Neill was also serving when, on the 23rd. of November 1942, we sailed in company with the Dutch light cruiser Heemskerck, and three Merchant ships, all loaded with oil drilling equipment bound for Abadan. Two days out, we were joined by the Tanker Goldmouth and HMA Corvettes, Cessnock and Toowoomba. To further set this scene I need to go back in time to prewar, then onwards to the time under review. The German motor vessel Ramses of 7,983 tons with a top speed of only 12 knots had been built in 1926, and left Hamburg on the 1st. of July, 1939 for Shanghai, where she arrived on the 25th. of August. With the declaration of war on the 3rd. of September 1939 - Ramses found herself stranded in the Far East, remaining at Shanghai until the 29th. of March 1941 when she sailed for Kobe in Japan.
Ramses in Japan prior to sailing as a Blockade Runner Ramses now remained at Yokahama, empty of any cargo, but now designated a prison ship for Allied prisoners who had been captured when their various ships had been sunk by German Armed Merchant Raiders prowling the oceans of the world.
Scuttling Charges.
Blockade Runner Cargo.
Farewell to Japan. Calling at Batavia was most important - the purpose, to load 4,000 tons of rubber, this product desperately short in Germany was allocated the highest cargo priority, it was to be carried even if other cargo had to be left behind. Finally, 1,500 cases of quinine were placed on board. Ramses now sailed from Batavia on the 23rd. of November, bound for Bordeaux, the ship hoping to run the Blockade by maintaining a sharp lookout at all times. A constant lookout was set by three soldiers, and three seamen in each watch, these were located, one in the crow's nest, one on each wing of the bridge, one forward, one aft, with the last man kept as a spare. All lookouts were given a powerful pair of binoculars, and there was a telephonic connection to both the crow's nest and the lookout posted aft in the ship, and the helmsman always wore a telephone headset.
Armament.
Crew.
Tactics. The crew had been promised a new Blockade-Running Medal, struck in the form of a chain, with a picture of Bremen breaking through to destroy the chain.
Action Stations aboard Adelaide.
By 1528 we were well placed on her beam to carry out a positive identification. Our
Captain was ably assisted by Lieutenant J.W. Penney, his Navigating Officer who had
served as a Mechant Navy Officer with experience of the construction details of many
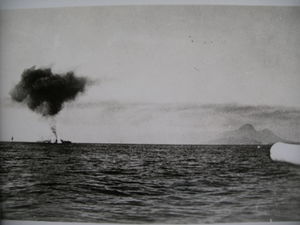
merchant ships. He quickly produced a photograph of the German ship Ramses from a Adelaide was 12,000 yards from Ramses, who, at this stage was flying a Norwegian Ensign. (Captain Esdaile was not going to be caught approaching this ship too close, as had done Captain Burnett in HMAS Sydney in November of 1941, to be sunk in a close encounter with the German Raider Kormoran, with the loss of Sydney's entire crew of 635 Officers and Sailors.) At 1536 Ramses was practically stopped and two boats were lowered on her port side.
About eight minutes later an explosion was seen at her stern; the wind quickly blew this
smoke so that it covered the whole port side, leaving only the masts and the top of the
funnel visible. Adelaide immediately opened fire, as did Heemskerck, by 1551.5 we
ceased firing, and Ramses sank at 1552. The crew had abandoned ship, except for her However, hits from Adelaide's third salvo quickly hastened their departure. As Ramses slipped beneath the sea, her main 6 inch armament, the wooden gun, together with its wooden platform gently floated off, and we suddenly realised just why we had not been subjected to fire from this source! Heemskerck was ordered to rejoin the convoy, whilst we busied ourselves with picking up survivors, seventy eight crew, (now prisoners of war) ten Norwegian Seamen, their ship sunk by a German Armed Merchant Raider, (now free men once more) a pig, and a dog. How ones' luck may quickly change with the vagries of war! My most vivid memory of this action, was the sight of some of our seamen who suddenly stopped hauling in German survivors, to rescue both the pig and the dog before them, indicating their priority in this rescue operation. I became most attached to this dog, but after our arrival at Fremantle, we disembarked both the Norwegians and the Germans, and Australian Quarantine Officers insisted on destroying the dog, to ensure that no disease was imported into the country. I was saddened.
Conclusion.
Search for Sydney. In naval history, it is most unusual for a ship to be lost with all hands, not a single survivor to tell what actually happened, the mighty Hood on blowing up had three survivors. In my own case of being sunk in the 8 inch cruiser Canberra, 84 died, 110 were wounded, but over 600 survived to be rescued by US destroyers Patterson and Blue. A Federal Government Inquiry was conducted, recently wild claims about finding the wreck off the WA coast were made, all to no avail. The Finding Sydney Foundation Inc. was formed some years ago to study all the available material world wide on Sydney's loss, to raise funds, and finally to commission a search vessel to actively search for both Kormoran and Sydney wrecks. In due course some millions of dollars were raised from the Corporate sector, private donations, but in the main from grants from the Western Australian and Federal Governments. At long last David Mearns was appointed as the Search Director, he had found both Hood, and Bismarck, the SV Geosounder with towed Sonar equipment set off from Geraldton on March 3, 2008, her task to search some 1,800 square miles of the Indian Ocean to the South West of Geraldton. The money raised was sufficient for a search to last till the end of April next. After 13 frustrating days of ploughing the ocean in much the same way a farmer ploughs his paddock, on Sunday March 16, 2008 the wreck of Kormoran was found. Once that wreck was found, I have always believed the finding of Sydney would soon follow by searching over an area 10 miles plus to the South East, based on the Kormoran's wreck position. And so it proved, on the next day Monday March 17, which just happened to be St Patrick's Day, the Sydney wreck site was located, just 12.2 miles SE from Kormoran, perhaps is just the luck of the Irish. Actually I suspected that having found Kormoran, the search team would immediately press on looking for Sydney, and may well have found her some time before the official announcement was formally made.
Plotting my estimation of the two wreck positions. Sydney is reported as sitting upright on her bottom, with partof her bow broken away. Of interest, some years ago I met Doctor Robert Ballard, author of "The Lost Ships Of Guadalcanal," who found amongst other wrecks, both Titanic and my Canberra at 2,500 feet in Iron Bottom Bay off Guadalcanal in the Solomons. Robert told me, with but one exception, all the sunken ships he had found finished up sitting upright on their bottom, in the process of sinking, ships generally right themselves to wind up sitting on their bottom.
Conclusion. This site is a declared War Grave, and no attempt to raise the ship, or disturb the dead will be made. But it is still a mystery to me how 645 men could all die, the ship did not blow up to be scattered in small pieces across the ocean floor, as I had anticipated. Not a single survivor escaped, most unusual! A remote controlled vehicle will now be sent down to gather close up pictures of the wreck, perhaps the mystery sinking with all hands of HMAS Sydney, may be resolved, but I suggest we should not hold our collective breath. Sydney Hull:
The acoustic shadow to the left of the hull is used to help identify structures that have height. For example we believe that the tallest shadow could be being caused by Sydney's superstructure. Careful analysis and measurements of the hull length suggest that while the hull is sitting upright on the seabed and is largely intact, a portion of the bow could well have broken away and that this event was the trigger that finally caused Sydney to sink. The Finding Sydney Foundation Photo Gallery: Have a look, some amazing pictures of both Sydney and Kormoran.
|